Post by hangover on Apr 18, 2014 20:13:56 GMT
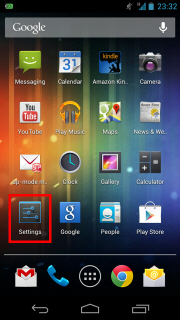
Start the "Settings" application on Android.
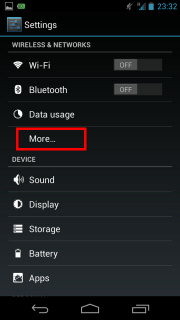
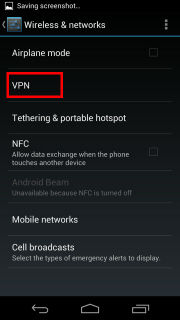
In the "Wireless & Networks" category, open "More..." and tap "VPN".
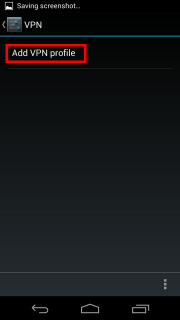
Click the "Add VPN profile" button to create a new VPN connection setting.
A new VPN connection setting editing screen will appear. Input something string on the "Name" field (e.g. "vpn" ), and choose "L2TP/IPSec PSK" in the "Type" field.
On this screen, you have to specify either hostname or IP address of the destination VPN Gate Public VPN Relay Server.
Open the VPN Servers List page, and click one VPN Relay Server which you want to use. Copy the DDNS Hostname (an identifier ends with ".opengw.net" ) or IP Address (digits as xxx.xxx.xxx.xxx) and paste it on the "Server address" field on the configuration screen.
In general, DDNS Hostname (an identifier ends with ".opengw.net" ) are recommended to specify. DDNS hostname can continue to be used even if the corresponding IP address of the DDNS hostname will change in future. However, in some countries or regions, you might be unable to use DDNS hostname. If you fails to specify a DDNS hostname, try IP Address (digits as xxx.xxx.xxx.xxx) specification instead.
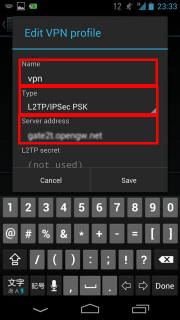
Scroll down the configuration screen, and tap the "Show advanced options" checkbox if appropriate.
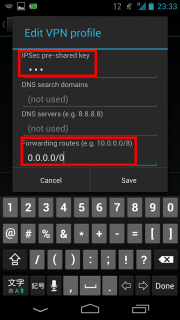
Specify "vpn" (3-letters) on the "IPSec pre-shared key" field.
Specify "0.0.0.0/0" (9-letters) on the "Forwarding routes" field. Make sure that you input the "Forwarding routes" field correctly. If not, you cannot communicate via VPN.
After all inputted, tap the "Save" button and save the VPN connection setting.
You can start a VPN connection by using a created VPN connection setting at any time. Open the VPN connection settings list and tap a setting, you will see the following screen.
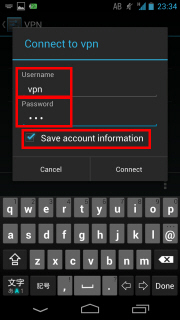
At the first time of using, you have to input "Username" and "Password" fields.
Specify "vpn" (3-letters) on both "Username" and "Password" fields, and check "Save account information" .
Tap "Connect" to start the VPN connection.

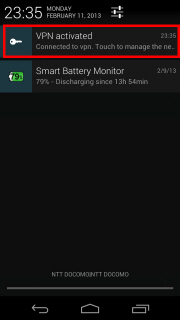

After the VPN connection will be established, the indicate string "Connected" will be displayed next to the VPN connection setting, and the status indication area of Android will show "VPN activated" message. You can tap the message to see the current status of the VPN connection.
I Used Jp VPN
Address: vg3064495916.opengw.net
Here are other addresses too Addresses
Step 2
After you have Connected to VPN Go to play store's App info
wait for it all to load
Now
Click "Clear Data"

Now i used Jp google acount when i tried this you are free to use your gmail but i'd make a new gmail just to be sure
make sure you are connected to VPN

Now make sure you are connected to VPN
Now lets open play store this should come up as always just press accept

Now wait for play to load and it should look like this

now just find the app you want and download


Now if you download with VPN its slow this is your choice if you want to disconnect

Now just wait for download to finish And Enjoy :3


Now i hope i helped you :3
In the "Wireless & Networks" category, open "More..." and tap "VPN".
Click the "Add VPN profile" button to create a new VPN connection setting.


A new VPN connection setting editing screen will appear. Input something string on the "Name" field (e.g. "vpn" ), and choose "L2TP/IPSec PSK" in the "Type" field.
On this screen, you have to specify either hostname or IP address of the destination VPN Gate Public VPN Relay Server.
Open the VPN Servers List page, and click one VPN Relay Server which you want to use. Copy the DDNS Hostname (an identifier ends with ".opengw.net" ) or IP Address (digits as xxx.xxx.xxx.xxx) and paste it on the "Server address" field on the configuration screen.
In general, DDNS Hostname (an identifier ends with ".opengw.net" ) are recommended to specify. DDNS hostname can continue to be used even if the corresponding IP address of the DDNS hostname will change in future. However, in some countries or regions, you might be unable to use DDNS hostname. If you fails to specify a DDNS hostname, try IP Address (digits as xxx.xxx.xxx.xxx) specification instead.

Scroll down the configuration screen, and tap the "Show advanced options" checkbox if appropriate.
Specify "vpn" (3-letters) on the "IPSec pre-shared key" field.
Specify "0.0.0.0/0" (9-letters) on the "Forwarding routes" field. Make sure that you input the "Forwarding routes" field correctly. If not, you cannot communicate via VPN.
After all inputted, tap the "Save" button and save the VPN connection setting.

You can start a VPN connection by using a created VPN connection setting at any time. Open the VPN connection settings list and tap a setting, you will see the following screen.

At the first time of using, you have to input "Username" and "Password" fields.
Specify "vpn" (3-letters) on both "Username" and "Password" fields, and check "Save account information" .
Tap "Connect" to start the VPN connection.


After the VPN connection will be established, the indicate string "Connected" will be displayed next to the VPN connection setting, and the status indication area of Android will show "VPN activated" message. You can tap the message to see the current status of the VPN connection.
I Used Jp VPN
Address: vg3064495916.opengw.net
Here are other addresses too Addresses
Step 2
After you have Connected to VPN Go to play store's App info
wait for it all to load
Now
Click "Clear Data"

Now i used Jp google acount when i tried this you are free to use your gmail but i'd make a new gmail just to be sure
make sure you are connected to VPN

Now make sure you are connected to VPN
Now lets open play store this should come up as always just press accept

Now wait for play to load and it should look like this

now just find the app you want and download


Now if you download with VPN its slow this is your choice if you want to disconnect

Now just wait for download to finish And Enjoy :3


Now i hope i helped you :3


